
How to Check a Refrigerated Van Before You Accept It
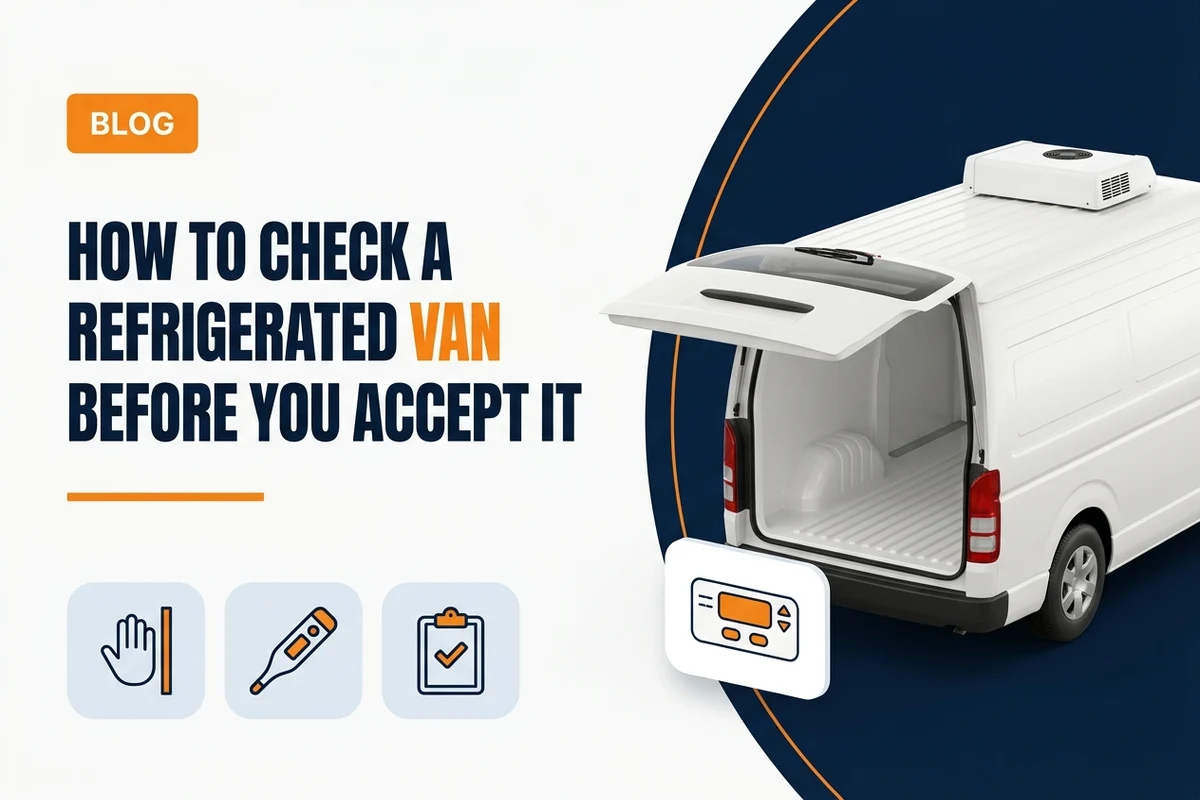
Most cold chain failures are not equipment failures. They are handover failures — a load goes into a box that was not cold yet, or into a body with a seal that stopped sealing months ago, and nobody noticed until the receiving depot rejected the delivery.
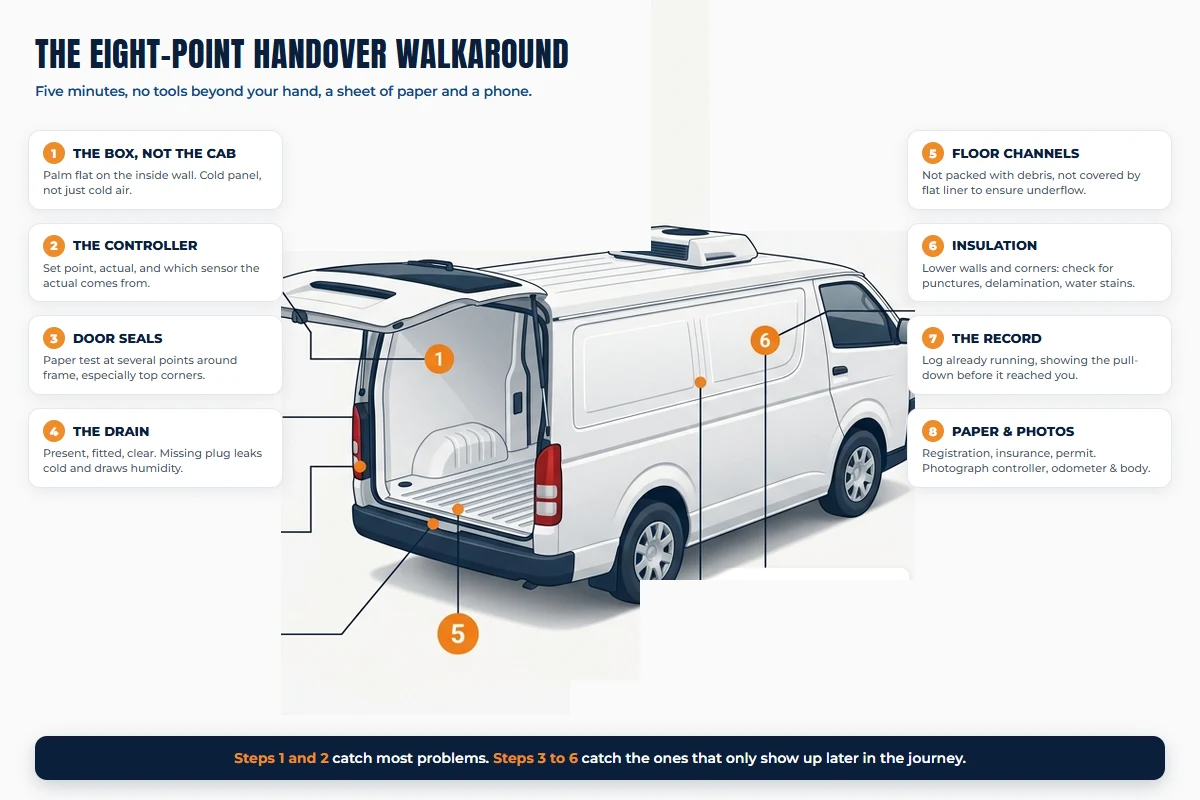
The inspection below takes about five minutes and needs no tools beyond your hand, a sheet of paper and a phone camera. It works whether you are collecting from us or from anyone else, and it is written to be used at the kerb rather than read at a desk.
If you only do two things from this page: touch the inside wall to confirm the box is genuinely cold, and ask which sensor the controller reading comes from. Those two catch most of what goes wrong.
1. Check the box is cold — not the cab
The cab air conditioning and the cargo refrigeration are two entirely separate systems. A pleasantly cool cab tells you precisely nothing about the state of the box behind it, and this is the single most common reason a customer believes they accepted a pre-cooled vehicle when they did not.
Open the rear doors and put your palm flat against the inside wall, then against the floor, then against the inside of the door itself. What you are feeling for is cold in the panel, not cold in the air.
The distinction matters because of thermal mass. A body that has been pulling down for half an hour has chilled the insulated panel, the floor and the doors, and all that cold material helps hold your cargo. A body that was switched on four minutes ago is blowing cold air past warm surfaces, and those surfaces will give their heat back to your load for the first stretch of the journey. The air temperature reads fine either way.
Two more signs worth a glance. Light condensation or an even sheen on the inside surfaces is normal and suggests the box has been cold for a while. Heavy frost build-up on the evaporator or around the door frame is not a sign of good cooling — it usually means air is leaking in, moisture is condensing and freezing, and the unit is working against a leak.
2. Read the controller properly
Nearly everyone glances at the display, sees a number close to what they asked for, and signs. The number on its own is not enough, because it depends entirely on which sensor it comes from.
The three readings
A refrigeration controller typically knows three things, and may show you one, two or all three:
- Set point. What the unit has been asked to hold. This is an instruction, not a measurement — it tells you what was requested, not what is happening.
- Supply air (also called discharge). The temperature of air leaving the evaporator. This is the coldest point anywhere in the system.
- Return air. The temperature of air arriving back at the unit after travelling over and around the load. This is normally the warmest point, and it is the closest available proxy for the condition of your cargo.
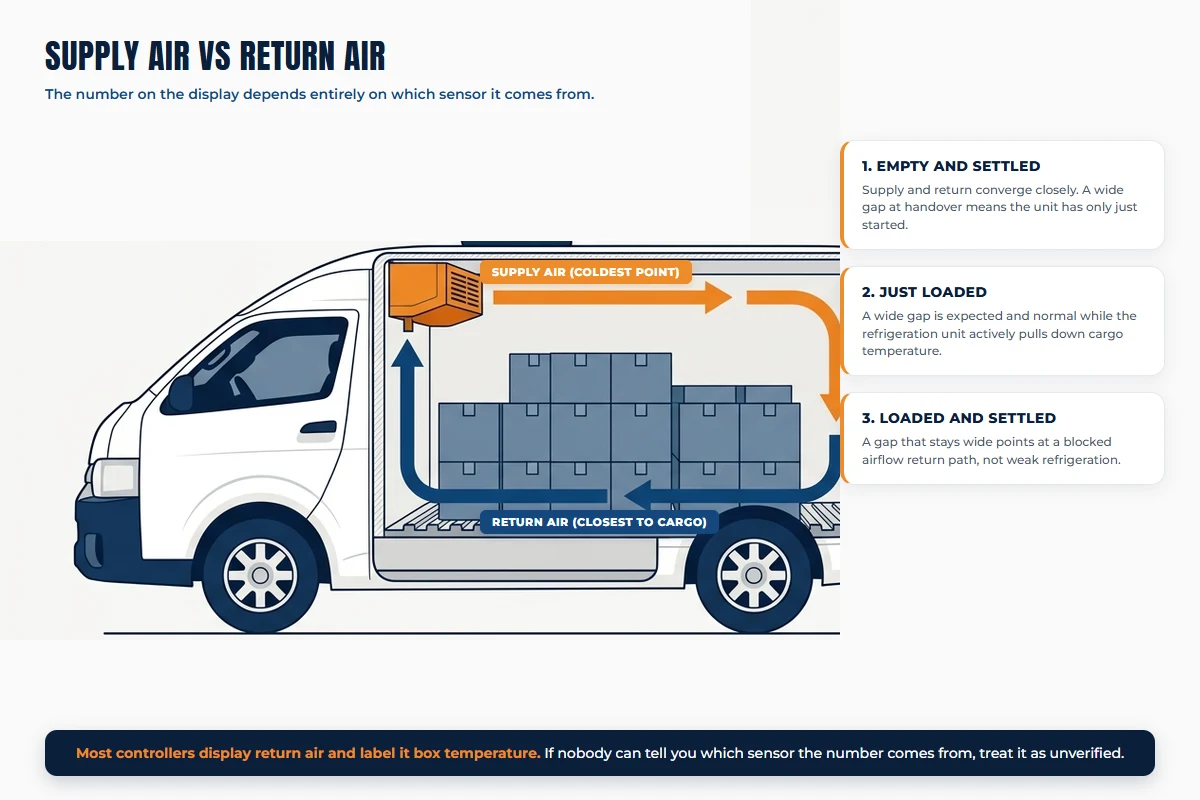
Ask which one you are looking at. If the answer is return air, good — that is the conservative figure. If it is supply air, the actual condition of your cargo will be warmer than the display suggests. If nobody at the depot can tell you, treat the number as unverified information rather than a reading.
What the gap between them means
On an empty box that has properly pulled down, supply and return converge fairly closely — there is very little heat load for the air to pick up on its trip through the body. So at handover, before anything is loaded, a wide split between the two is worth asking about. It usually means the unit has only recently started.
Once you are loaded, a wide gap is entirely expected for a while, because the air is doing real work pulling down the cargo. What matters is that it narrows as the journey settles. A gap that stays wide on a settled load points at airflow rather than refrigeration capacity: something is blocking the return path, most often cargo stacked against the evaporator or packed tight to the ceiling.
That is worth knowing because the instinctive response — turn the set point down — makes it worse. A colder set point makes the unit run harder against an obstruction while the cargo at the far end of the body stays where it was.
3. Test the door seals
Doors are where refrigerated bodies fail first, and seal wear is invisible until you test it. The rubber compresses, hardens and takes a set; hinges sag over years of loading; catches wear and stop pulling the door in as tightly as they did.
The paper test. Take an ordinary sheet of paper, place it across the seal, close the door onto it, and pull. You want clear resistance — the paper should drag, or tear before it slides out freely. If it comes out with no resistance at all, the seal is not making contact at that point.
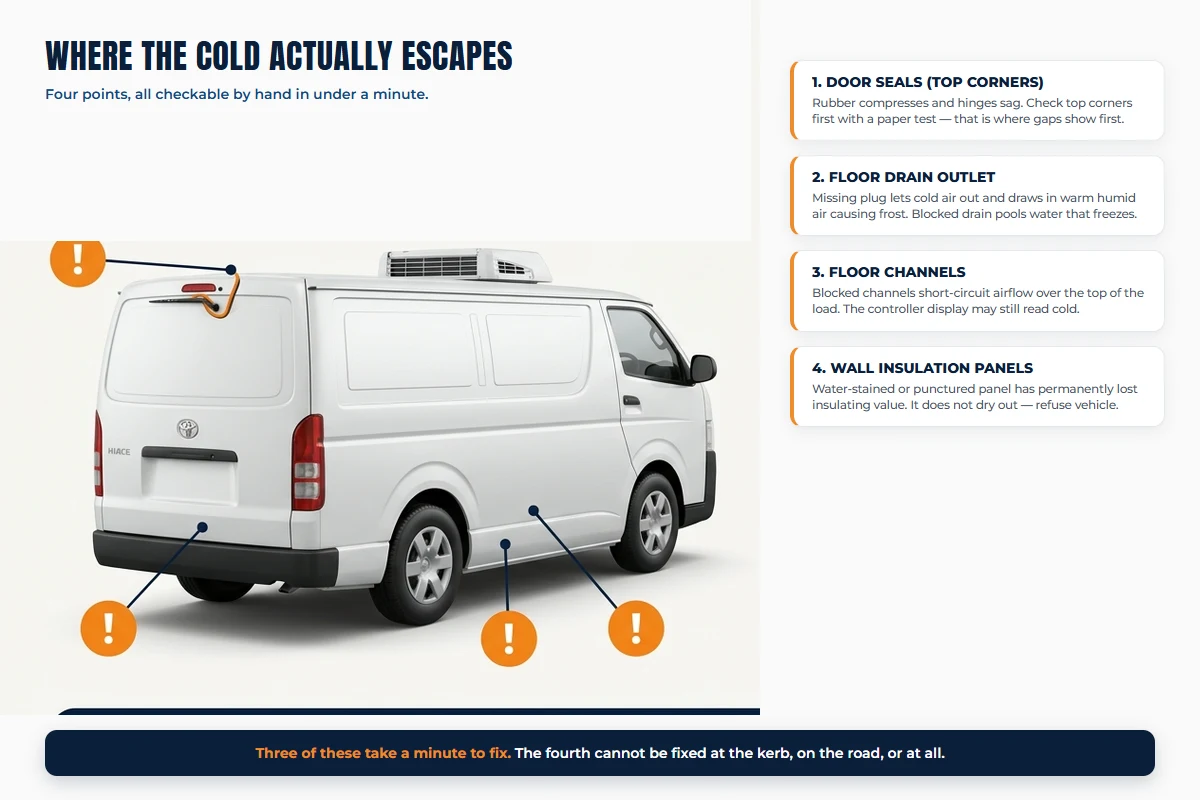
Do this at five or six points around the frame rather than one. Seals rarely fail evenly. Check the top corners first, because that is where hinge sag shows up earliest and where warm air enters most readily.
A second check takes five seconds: step inside, pull the doors to, and look around the frame for daylight. Any visible line of light is a direct path for heat, and in a UAE summer that path is doing real work against you all day.
4. Find the drain and check it is clear
Every refrigeration cycle produces water. Moisture condenses on the evaporator, defrost cycles melt it, and it has to leave the body somehow — usually through one or two small drains in the floor, fitted with a plug or a one-way valve.
This is a two-second check with a disproportionate consequence in both directions:
- Plug missing or left out. You now have a permanent hole in an insulated box. Cold air escapes, warm humid air is drawn in, and that moisture reappears as frost inside the body.
- Drain blocked. Water pools on the floor instead of leaving. In a freezer body it freezes there, and over repeated cycles it lifts the floor covering and works into the insulation — which is the beginning of a much more expensive problem.
5. Check the floor channels are clear
Most refrigerated bodies have a ribbed or T-section floor. Those channels are not a styling choice: they let cold air travel underneath the load and return to the unit, so that air circulates around the cargo rather than only over the top of it.
Two things defeat them. The channels get packed with debris — cardboard, shrink wrap, bits of produce — or somebody lays a flat liner, sheet or board across the floor to keep it clean, which seals them completely.
When the under-floor path is closed, air short-circuits across the top of the load and straight back to the unit. The controller reads a comfortable return air temperature because the air it is measuring never went near the bottom of your cargo. Meanwhile the lowest layer, sitting on a floor with no airflow, is the warmest thing in the van.
6. Look for insulation damage
Insulated panel takes a beating in normal service. Trolleys, roll cages, pallet corners and forklift tines all find the lower walls, and the damage accumulates where nobody looks.
Scan for three things, concentrating on the lower half of the walls and the corners:
- Punctures and gouges that break through the internal lining. Once the lining is breached, moisture reaches the insulation core.
- Delamination — the lining bulging or coming away from the panel behind it. Press gently; it should feel solid, not springy or hollow.
- Water staining or discolouration, particularly low down and in corners.
Water staining is the one to take seriously. Wet insulation does not recover. Closed-cell foam that has taken water on permanently loses a large part of its insulating value, gets heavier, and does not dry out in service. A stained panel is not cosmetic damage — it is a body that will struggle to hold temperature on a hot afternoon for the rest of its life, whatever the unit on the roof is capable of.
7. Ask for the temperature record from before you loaded
By the time you are standing at the vehicle, the useful part of the temperature record already exists: the pull-down that happened before the van reached you. Ask for it.
What you are looking for:
- The log is already running, not something that gets switched on when you arrive.
- It shows a pull-down — a curve descending to the set point and then holding — rather than starting flat at ambient a few minutes ago.
- The interval is short enough for your cargo. Five-minute intervals or shorter are normal for pharmaceutical work. Longer intervals can miss a short excursion entirely.
- For GDP-governed work, the logger has a current calibration certificate. An uncalibrated logger produces numbers, not evidence, and an auditor will treat it that way.
This record is worth more than it looks. If a consignment is questioned later, the handover log is what establishes that the vehicle was at temperature when your cargo went in. Without it, any dispute about where the cold chain broke starts from an absence of evidence — and absence of evidence tends to be resolved against whoever cannot produce any.
8. Check the paperwork, then photograph everything
Paperwork
| Document | What to check |
|---|---|
| Vehicle registration | Present in the vehicle and currently valid |
| Motor insurance | In date, and valid for the driver category you are putting behind the wheel |
| Goods-in-transit cover | Whether it exists at all — motor insurance does not cover your cargo |
| Food transport permit | Required for food work; confirm it covers the vehicle you are taking |
| Driver licence | Correct UAE category for the vehicle, if you are self-driving |
| Rental agreement | Deposit, fuel policy, excess, breakdown cover, and who carries downtime |
The row people skip is goods-in-transit. Motor insurance covers the vehicle and third-party liability; it does not cover the value of what is in the back. Cover for the cargo is a separate policy, and for temperature-sensitive goods it frequently carries conditions about pre-cooling and continuous temperature records. Find out which policy covers what before you load, not after a claim.
If you are moving food, the municipality permit matters for a practical reason as well as a legal one: the receiving depots at most large retailers will ask for it, and a vehicle that cannot produce one can be turned away at the gate with the load still on board.
Photographs
Thirty seconds of photographs settles almost every return dispute. Take:
- The controller display, showing set point and actual reading together
- The odometer and the fuel gauge
- All four exterior corners
- The interior floor, walls and ceiling
- The door seals
- Any damage that already exists, close up and in context
Your phone timestamps them, which is the entire point. A photograph of a scuff that already existed is worth considerably more than a recollection of it.
When to refuse the vehicle
Most findings are worth a conversation rather than a refusal. A few are not, because accepting them means accepting the consequence.
| Finding | What it means | Action |
|---|---|---|
| Walls at ambient, no explanation | Not pre-cooled. Your cargo will pull down the body. | Do not load. Wait or swap. |
| Water-stained or delaminated panel | Permanently reduced insulation value. | Refuse the vehicle. |
| Paper test fails in several places | Continuous heat ingress all day. | Refuse or have it repaired. |
| Logger not running or no record | No evidence baseline for your consignment. | Do not load until it is running. |
| No food permit, food cargo | Rejection risk at the receiving gate. | Refuse the vehicle. |
| Drain plug missing | Continuous cold loss and frost build-up. | Fit one before loading — quick fix. |
| Floor channels blocked | Airflow short-circuits over the load. | Clear them before loading — quick fix. |
| Light frost around the door frame | Air is leaking in and condensing. | Check the seal, then decide. |
The pattern is worth noting: the quick fixes are the mechanical ones, and the refusals are the ones about the body. A missing plug takes a minute. Wet insulation cannot be fixed at the kerb, cannot be fixed on the road, and will quietly cost you cargo condition on every warm day you run that vehicle.
A note on who this is really for
If you hire refrigerated vehicles regularly, the most valuable thing on this page is not any individual check. It is that the list exists and someone runs it every time.
Handover is the one moment when the condition of the vehicle and the responsibility for the cargo change hands at the same time. Five minutes there is worth more than any amount of care afterwards, because afterwards you are managing a problem instead of declining one.
It is also a reasonable thing to ask of whoever you hire from. A provider who has no objection to being checked, who can tell you which sensor the display reads, and who hands you a log that was already running, is demonstrating something about how they run their fleet — and doing it more convincingly than any claim on a website.
Related reading
If you are still working out which vehicle you need rather than inspecting one, chiller van internal dimensions covers sizing a body to a load, and high roof or standard chiller van covers the height decision. For specifications, see the Toyota Hiace chiller van and the 1-ton freezer van.
If you are taking a vehicle out yourself rather than with a driver, self-drive chiller van hire sets out what you need to bring to handover. Where a trained cold-chain driver runs the vehicle instead, the inspection above is still worth doing — but it becomes a conversation with the driver rather than a solo walkaround. See chiller van rental with a driver.
Frequently Asked Questions
- How long should a refrigerated van handover inspection take?
- About five minutes for the vehicle itself, plus a couple of minutes for paperwork and photographs. It is the cheapest insurance in the whole rental: the two expensive failures it prevents are a load that arrives out of specification and a damage dispute when you return the vehicle.
- How can I tell if a refrigerated van is actually pre-cooled?
- Touch the inside wall of the cargo compartment rather than feeling the air. A box that has been running holds cold in the panel itself and feels cold to the palm across the whole surface. A van that has just been switched on blows cold air at the discharge vent while the walls, floor and doors are still warm — and those surfaces will pull heat back into your cargo for the first part of the journey.
- What is the difference between supply air and return air temperature?
- Supply, sometimes called discharge, is the air leaving the evaporator — the coldest point in the system. Return is the air coming back to the unit after passing over the load, and it is normally the warmest. Return air is the number that best represents the condition of your cargo, so it is the conservative figure to work from. Many controllers display return air and simply label it box temperature.
- Should supply and return air temperatures be the same?
- On an empty, fully pulled-down box they converge closely. A wide gap means either the unit is working hard against a real heat load, which is expected shortly after loading, or air is not circulating properly. On an empty van at handover, a wide gap is worth asking about before you accept the vehicle.
- Why does the drain plug matter on a refrigerated van?
- Defrost cycles produce water that has to leave the body. If the plug is missing, you lose cold air continuously and draw in warm humid air that becomes frost inside the box. If it is blocked, water pools on the floor, freezes, and over time lifts the floor covering and soaks into the insulation. Either way it is a two-second check with a disproportionate consequence.
- Does van rental insurance cover my cargo?
- Usually not. Motor insurance covers the vehicle and third-party liability. Cover for the goods in the back is normally a separate goods-in-transit policy, and for temperature-sensitive cargo it often carries specific conditions about temperature records and pre-cooling. Establish which policy covers what at handover rather than after a claim.
- What should I photograph before driving away in a rented refrigerated van?
- The controller display showing set point and actual temperature, the odometer, the fuel level, all four exterior corners, the interior floor and walls, the door seals, and any damage that already exists. Timestamped photographs settle almost every return dispute in about thirty seconds, and cost nothing to take.
- What would make me refuse a refrigerated van outright?
- Water-stained or delaminated insulation panel, a cargo compartment that is still at ambient temperature with no plausible explanation, door seals that fail the paper test in several places, a temperature logger that is not running or has no recent record, or a missing municipality food transport permit when you are carrying food. Each of those either threatens the load or leaves you carrying the consequences.
Take the checklist with you
Every vehicle we hand over arrives pre-cooled with the log already running, and we will walk the inspection with you if it helps. If you are checking someone else’s vehicle, use the list above anyway — a provider who minds being checked is telling you something.